Generic Midi Dial configuration
Overview
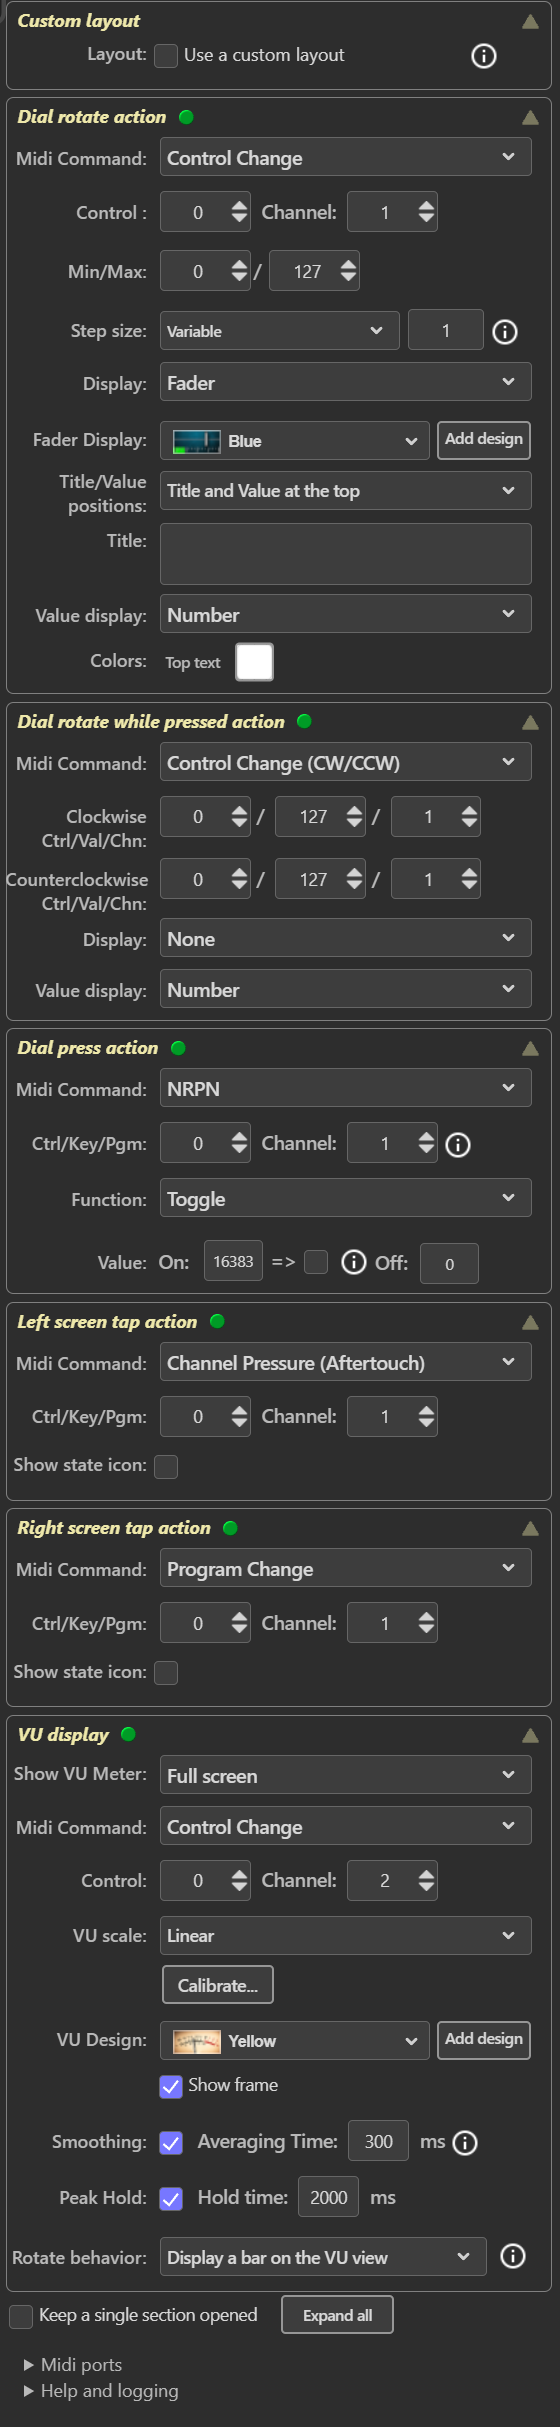 The plugin can respond to five possible usages of the dial: rotate, press, rotate while pressed, left screen tap and right screen tap. Separate actions can be assigned for each type of use, and the editor is divided into five sections to visualize this.
In each section, you define what Midi command will be sent when activated (if any) and how the value should be visualized on the display when the Midi command is sent or received.
Please note that if the plugin is in a stack, the "dial press" action is reserved for switching to the following plugin in the stack, and the plugin is never notified that the dial is pressed. Due to this, the following restriction is in place when the plugin is in a stack:
- The "Dial press action" will never be activated by a dial press. You can, however, configure a state icon on the display and trigger the action by tapping the display. This will work even when the plugin is in a stack.
With all sections configured, the editor view is relatively large, but you can minimize/maximize individual sections by clicking the section header.
You also have the option to keep only one section open, in which case the section you select will be opened, and all other sections will be minimized.
Active sections display a green or red indicator in the section header; sections lacking an indicator are not active. A green indicator means the plugin hasn't found any issues with the configuration of that section. A red indicator indicates the section needs your attention, either to fix a problem or finish the setup.
In the "Custom layout" section, you can load a custom layout to replace the built-in layout for the selected display type. Please refer to the pages for custom layouts for more information.
Dial response
When you rotate a dial, the Stream Deck software reports this every 50 milliseconds to the plugin. The report includes the number of "ticks" passed during the last 50 ms period, where one "tick" is the physical step you feel when you turn the dial.
You can configure how the dial should respond when you rotate it. Available options are a fixed step size and some different variable step size options.
With a fixed step size, the value is changed with the defined step size for each "tick" reported by the Stream Deck software.
The variable algorithms use the tick value and the defined step size to calculate how much the value should change, allowing you to choose a dial response that suits your work style. A slower starting curve gives you better control for fine adjustments, while a steeper starting curve still allows for fine adjustments at very low speeds but quickly accelerates value adjustments at higher rotation speeds.

The graph uses a defined step size of 1 and a 0-127 range. All algorithms are tuned to return a value equal to the defined max value when the number of ticks is 13, which is quite fast.
Example scenario
 Let me give you a quick example to give you a sense of what you can do with a single dial.
Configure the "Dial rotate" action to send a CC that controls the master volume and to display a volume fader on the display, optionally with a suiting dB value display.
Configure the "Dial rotate while pressed" action to send a CC that controls the pan of the master channel and to display a horizontal bar indicating the pan position, optionally with a +/- percentage.
Configure the "Dial press" action to send a CC that controls the mute of the master channel and to display a state icon that shows the current mute state.
With these settings in place, you can adjust the volume by rotating the dial, adjust the pan by rotating the dial while it is pressed, and mute/unmute the channel by pressing the dial (or the state icon on the display). The default value display shows the value for the "rotate" CC. The value for the "rotate while pressed" CC is shown while that action is performed, and the value will linger for 1.5 seconds after you have stopped turning the dial, after which time the "rotate" CC value is restored on the display.
Worth mentioning here is that the "Dial press" action is only triggered on dial release, provided that you have not turned the dial since it was pressed. If you press the dial, rotate it and then release it, the "Dial press" action will not be triggered.
Editor sections
Control Change commands
 Control Change commands with increasing or decreasing values are sent when you rotate the dial. Select the CC number and channel (1-16) to use, the min and max values (0-127) to be sent when the dial is rotated.
NRPN commands
 NRPN commands are configured the same way as CC commands, with the difference that both the controller and the value range from 0-16.383.
Control Change (CW/CCW) commands
 Control Change commands with static values are sent when you rotate the dial, and different commands can be sent on clockwise and counterclockwise rotations. For each physical step of the dial, the same command is sent. This is used for functions where the command signal steps in a direction rather than an absolute value. When Control Change (CW/CCW) is selected, the dial is endless.
Pitch Bend, Aftertouch and Program Change commands
 The Pitch Bend, Aftertouch, and Program Change commands have no "Control" field since they don't have any value associated with them. Contrary to the CC/NRPN commands, where you have a fixed control for which the dial controls the values sent, the dial for these commands affects the "control" itself, i.e., the Pitch Bend, Aftertouch, or Program.
The value range for Pitch Bend is 0-16,383, while Aftertouch and Program Change range from 0-127.
Display - Fader
 You can choose from a built-in set of fader designs or add your own design. Please check the page for dial fader image files for more details on custom faders.
You can enter a title that will be displayed superimposed over the fader, and you can set the text and background colors to make the title visible against the fader background. The title can reference the LCD strip information for the channel by using the tags #LCDU# and #LCDL# for the upper and lower LCD strip rows. The Mackie channel number can be referenced using the tag #CHNR#. This is the sequential number counting from the first channel on the first Mackie Control device to the last channel on the last Mackie Control device.
A value can be displayed above the fader, and you can show the raw Midi value, a percentage (0 to 100% or -50- to 50%), a preconfigured pan value, a value from a translation file or a dB value. Some built-in dB files are available, and you can add your own dB configuration as described on the Fader DB Files page. You can set the text color for the value but no background color.
Since the fader and the title occupy the same space, you can select what will happen when the fader handle and the title "collide".
- If you select to move the title, it will be located on the left side of the fader when the handle is on the right half, and vice-versa.
- If you select to hide the title, it will be located on the left side of the fader when the handle is on the right half and hidden when the handle is on the left half.
- If you select to do nothing, it will be stationary on the left side of the fader, even when the handle occupies the same space.
Display - V-pot
 You can choose from a built-in set of V-pot designs or add your own design. Please check the page for V-pot image files V2 for more details on custom faders.
The value display options are the same as described for the fader above, and you can set the text color. The value is displayed outside the V-pot. You can enter a title that will be displayed superimposed over the center of the V-pot and set the text color to make the title visible against the V-Pot.
 You can choose to display the V-pot in half or full size.
 The V-pot state can be displayed with a ring around the centerpiece. A portion of the ring will be displayed according to the selected option:
If the active span indication is From min to max (volume), the ring will be visible from the leftmost position (= midi value 0) to the current midi value.
If the active span indication is From midpoint (pan), the ring will be visible from the center position (= midi value 64) to the current midi value (left or right).
If the active span indication is From midpoint (spread), the ring will be visible from the center position (= midi value 0) to both sides with a total span at midi value 127.
If the active span indication is At current value, the ring will be visible only at the current midi value.
If the active span indication is None, the ring will not be visible.
 You can show the raw Midi value, a percentage (0 to 100% or -50- to 50%) or a dB value for text display. Some built-in dB files are available, and you can add your own dB configuration as described on the Fader DB Files page.
 You can select to send the same commands as when rotated, send a different command when you rotate the dial while pressed or have no action.
 If you select "Same as above", the only available property is the step size. This configuration is targeted at giving the rotation action coarse control with larger steps and the rotation while pressed fine control with smaller steps.
 You can select not to have any graphical display for this action or choose between two bar types. In the picture, the upper one is the "pan" bar, where a triangle marks the current value (pan position). The lower bar is the "volume" bar filled from the left to indicate the current value.
 When the dial is pressed, you can send Control Change, Note On/Off, Program Change, Pitch Bend, and Aftertouch commands. The additional options depend on which command type you select.
 Select the Control, Key or Program you want to control with a dial press, and select the Midi channel.
 Control Change and Note actions can be defined as Push or Toggle actions. A Push action will always send the On value when the dial is pressed. A Toggle action alternates between the On and Off values when the dial is pressed. Note actions will send a Note On command when sending the On value and a Note Off command when sending the Off value.
 Apart from the common parameters explained above, there are no additional options when selecting Pitch Bend, Aftertouch or Program Change. These commands have no additional parameters; either you send a Pitch Bend, Aftertouch or Program Change command, or you do not. You cannot set these commands On or Off, so when Pitch Bend, Aftertouch or Program Change is selected, a screen tap is, by definition, a Push action, and the same command will be sent every time.
 The left and right screen tap actions work precisely as the dial press action; you can send Control Change, Note On/Off, Program Change, Pitch Bend, and Aftertouch commands when the left or right half of the screen is tapped. Additional options depend on which command type you select.
 You can enable state icons showing the selected command's current state in the top left and right corners of the dial's display. Select the icons/images displayed for the On and Off states. Images can be of any size; they will be resized to fit in the space (40x40px or 90x90 if large icons are selected). The selected icon is displayed on the button.
 Apart from the common parameters explained above, there are no additional options when selecting Pitch Bend, Aftertouch or Program Change. These commands have no additional parameters; either you send a Pitch Bend, Aftertouch or Program Change command, or you do not. You cannot set these commands On or Off, so when Pitch Bend, Aftertouch or Program Change is selected, a screen tap is, by definition, a Push action, and the same command will be sent every time.
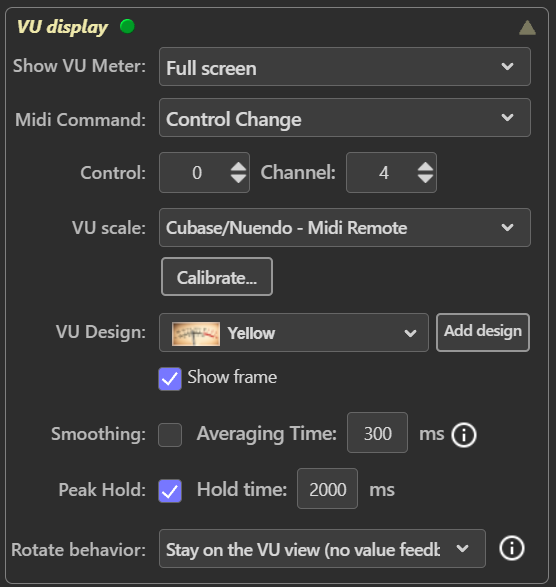
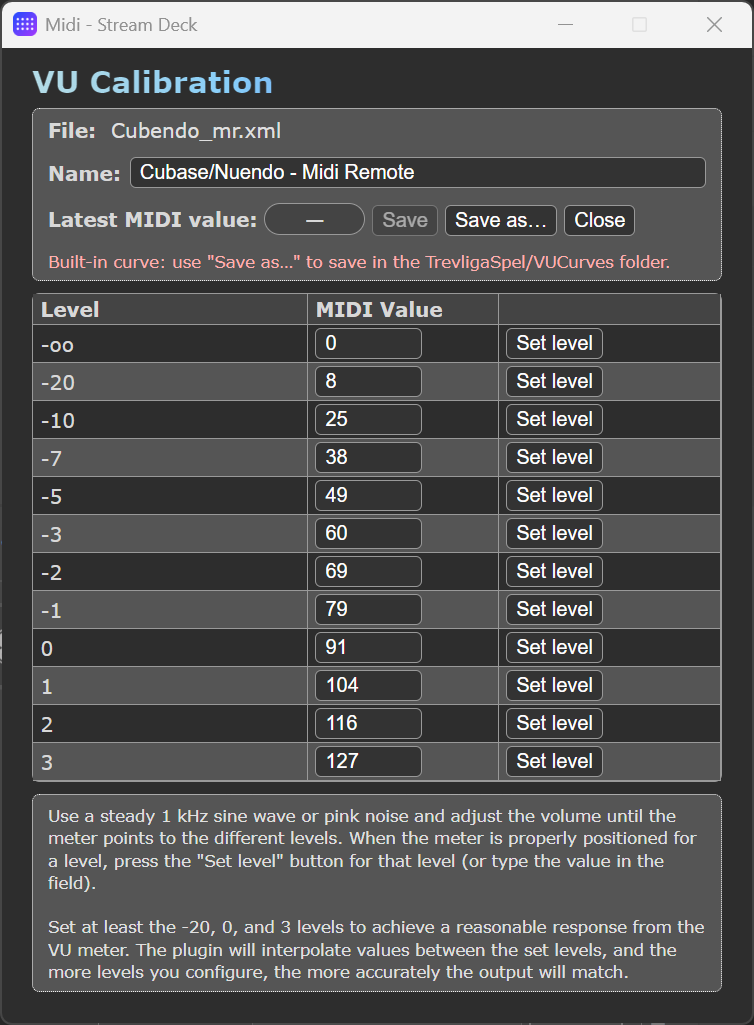 VU calibration is the process of teaching the plugin to map incoming MIDI commands to the VU scale in the display. The principle is quite simple: feed the plugin a steady signal, then save the MIDI value for each numbered level on the VU meter.