Generic Midi button setup
Overview
The Generic Midi button is a second-generation button that replaces certain other button types. It can combine any MIDI command with any display type, making it powerful... and quite complex.
Explaining every detail of the button would likely make the documentation too complex, so I'll focus on the key parts.
For users of the first-generation buttons, the main differences are:
- The Control Change/NRPN buttons can be replaced, but the fader designs are different (matching those used by the dial faders), and option files cannot be used.
- The Program Change buttons can be replaced.
- The Note On/Off buttons can be replaced unless chords or Expression/Articulation files are used.
The Generic Midi button can handle Control Change, NRPN, Note On/Off, Program Change, Pitch Bend, and Channel Pressure (Aftertouch) messages, and it can be controlled by a script. It can function as a Push, Toggle, Hold, Latch, or Cycle button, or as a fader, a Vpot, or a ScrubWheel control.
Button type

Select how the button should behave:
- A Push button will always send an "on" command when pressed.
- A Toggle button alternates between "on" and "off" when pressed.
- A Hold button will send an "on" command when pressed and an "off" command when the button is released.
- A Fader button repeatedly sends increasing or decreasing values while being pressed and can be used to control, e.g., a volume fader. Two Fader buttons can be configured to control the same fader, increasing and decreasing the value.
- A Cycle button cycles through a distinct set of values defined in a configuration file.
- A Latch Button acts like a Push button but will also send a an Off command for any previously used Latch button (see "Latch group" below for more details).
- A V-pot button repeatedly sends increasing or decreasing values while pressed and can be used to control, e.g., a pan control. Two V-pot buttons can be configured to control the same target control, one increasing and the other decreasing the value. You can also have a single V-pot button where you switch direction by double-pressing the button.
- A Scrub wheel button repeatedly sends the same value while being pressed and can be used to control endless controls. The Scrub wheel button is the same as a V-Pot button in most parts, except that it is endless and constantly sends the same value instead of an increasing/decreasing value.
Fader buttons feature a fader button design, V-pot and Scrubwheel buttons have a V-pot (knob) design, and the other button types are two-state buttons that can display two different icons.
Fader, V-pot, and Scrub wheel buttons can be set up in a dual-button configuration. For faders, the display will extend to cover both buttons. V-pot and Scrub wheel buttons will have separate knob displays but will control different directions.
Scripted buttons, faders, and V-pots have assigned display types, but the script controls everything else.
Choose a section below to learn more about the selected button type.
Command / Channel
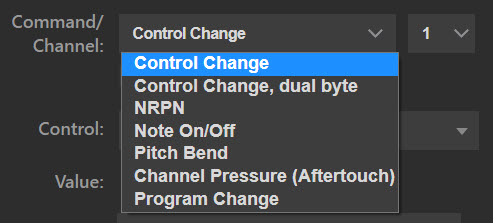 Choose the MIDI command and MIDI channel for the button. These options are unavailable when using a scripted button because the script manages everything.
Control and value settings
The control and value settings vary slightly depending on the MIDI command and display type.
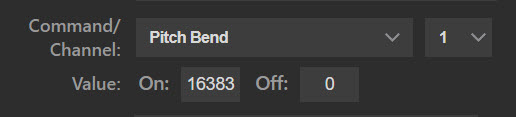 For MIDI command types that only send a value (Pitch Bend, Program Change, and Channel Pressure), the "Control" property is not available. For example, if you configure a Hold button to send Pitch Bend with On=16383 and Off=0, it will send a Pitch Bend 16383 message when you press the button and a Pitch Bend 0 message when you release it.
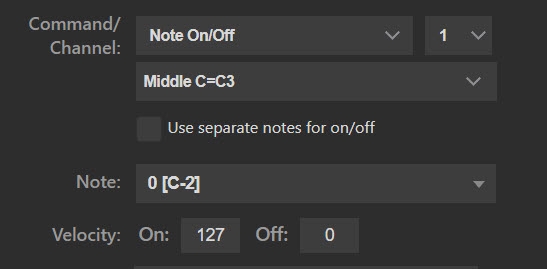 For MIDI command types that send a control and a value (Control Change, NRPN, Note On/Off), the "Control/Note" property is available. For example, if you configure a Hold button to send Control Change with control=10 and On=127, Off=0, it will send a CC10 value 127 message when you press the button and a CC10 value 0 message when you release it.
 For control+value buttons, there is an option to split the controls so that different controls are used for the On and Off values. With split controls, you can, for example, configure a Hold button to send a CC10 value 127 message when pressed and a CC12 value 64 message when released.
Controls and note values are shown with a searchable dropdown where you can either select a value from the list or type to narrow down the options and choose one.
Value
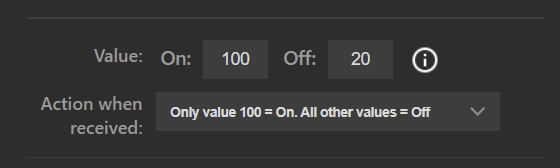 Set the values for "On" and "Off" commands. The default values are 127 for "On" and 0 for "Off," but you can modify them if your device or DAW requires different settings. If a single-byte command is selected, the maximum value is 127; for NRPN or a dual-byte command, the maximum value is 16,383.
The dropdown determines how received values affect the button state. The options are:
- The On value and all values above it will set the button to the On state. Values below the On value will set the button to the Off state.
- The On value will set the button in the On state. All other values will set the button in the Off state.
- The On value will set the button in the On state. The Off value will set the button in the Off state. All other values are ignored.
Minimum hold time
 (Only visible if button type is "Hold")
For Hold buttons, some devices or DAWs might miss the "off" command if it is sent too soon after the "on" command. The Cubase "Forward" function, for example, will ignore the "off" command if it is sent less than 250 milliseconds after the "on" command (...don't ask me why). If you press a Hold button briefly and the system doesn't respond to the "off" command, try adding a minimum hold time (in milliseconds). If your key press is shorter than that time, the plugin will delay sending the "off" command until the minimum time has elapsed.
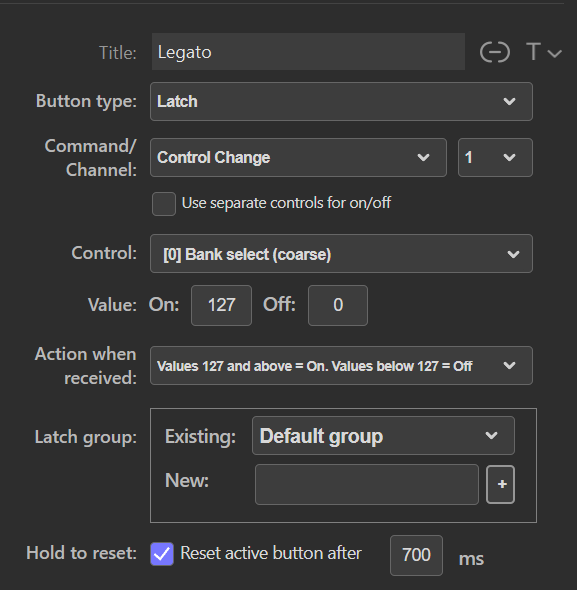 A latch button is, in effect, a Toggle button with an added association with a "latch group".
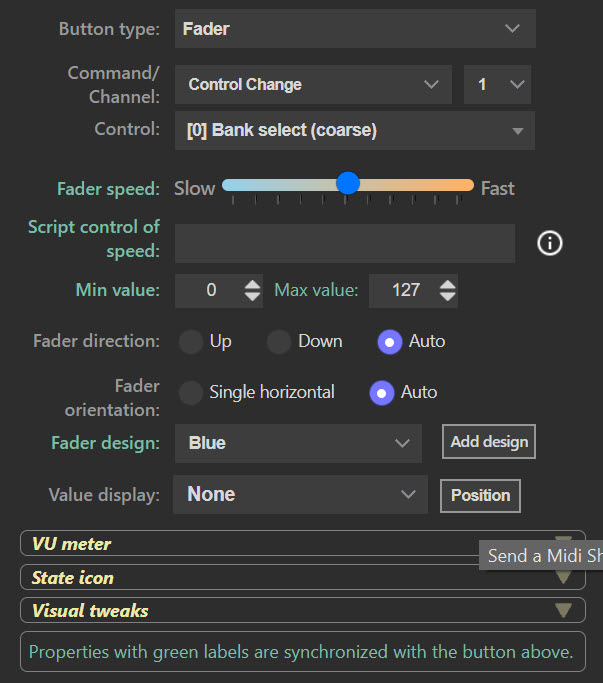 The fader button is designed to display a mixer fader.


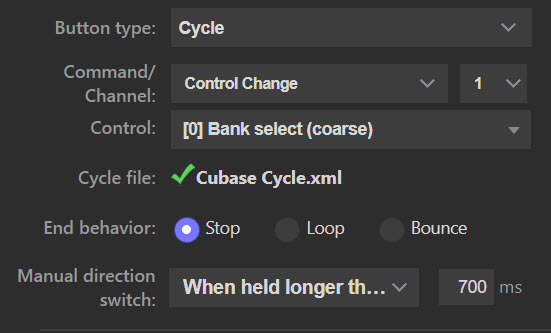 A cycle button relies entirely on a configuration file ("Translation file") that specifies the steps it should cycle through. Every time the button is pressed, it advances to the next item listed in the configuration file, sends the Midi value directly or glides to it, and displays the (possibly translated) value on the button and optionally shows a button image associated with that specific value.
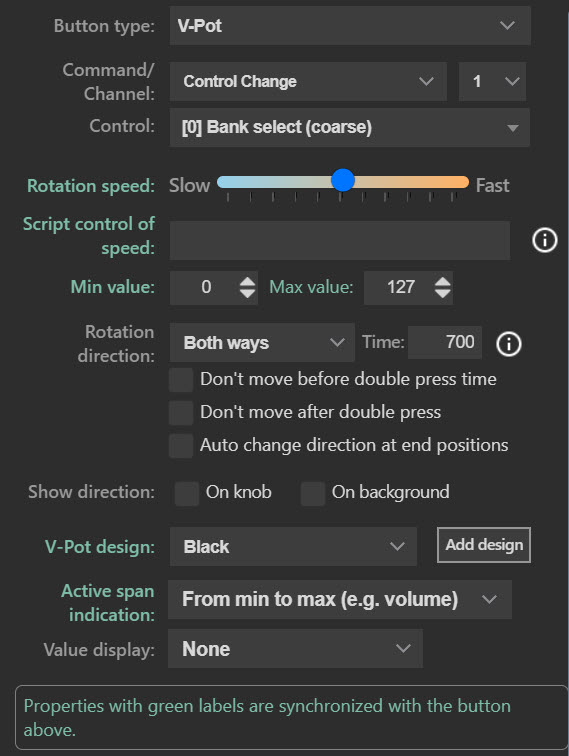 The name "V-pot" is borrowed from the Mackie Control, where it describes a knob that can rotate. The function is similar to the Fader button, but the V-pot can provide clearer visual feedback when controlling a knob that appears in your DAW.
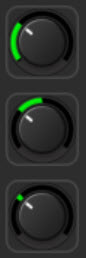 Besides rotating the button's centerpiece, the V-pot state can be shown with a ring around it. A portion of the ring will be displayed according to the selected option:
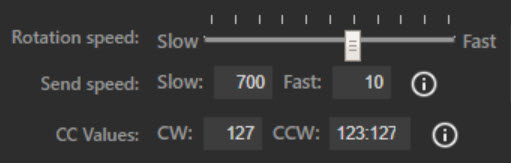 Scrub wheel buttons have most of the same features as V-Pot buttons. While a V-Pot button has a limited rotation range and sends different values depending on its position, a Scrub wheel button is endless and always sends the same value.
  The Scrub wheel button repeatedly sends the same value when pressed, unlike the V-Pot where the value depends on the position.
 Scripted buttons lack editor properties except for the script (inline or loaded from a file).
Midi Out port
Select the Midi port that should be used for sending commands. If available, the default port "StreamDeck2Daw" is selected when you create a button, but you can select any other port if required. When you change the Midi port for one button, the change affects that button only, but the new Midi port selected will be the default port for all new buttons created from that point on (for all kinds of commands).
Midi In port
Select the MIDI port to receive commands. If available, the default port, "Daw2StreamDeck," is chosen when you create a button, but you can pick any other port if needed. Changing the MIDI port for one button only affects that button, but the new port will become the default for all new buttons created afterward.
If the button is a Push Button and you don't need feedback on the command for the button, set the input port to "No MIDI Input." This indicates to the plugin that the other party will never send any state to the button, and since it is a Push Button, the plugin will always keep it in the "off" state.
Button states and Icons
When the button is set as a cycle button, fader, v-pot, scrub wheel, or is scripted, it lacks specific on/off states. Icons should NOT be assigned in the Stream Deck editor, as doing so will prevent the plugin from displaying the correct images.
For push, toggle, hold, and latch buttons, each button has two states and two icons. The first icon represents the off/inactive state, so an appropriate icon should be chosen for this. The second icon represents the on/active state, and an appropriate icon should be selected for this.